Basic Crafting Instructions for making an Exquisite Easter Egg Box
Scissors for intricate paper cutting
White craft glue and white "tacky" glue
Paintbrushes for painting and applying glue
Acrylic paint - white for the base coat and
colored paint for the top coat
Step 1 ~ prepare the egg box
To prepare the cardboard egg box, we always start by painting at least two undercoats of
white acrylic
paint to both halves of the egg.
Just like
when you apply a
base coat before
painting a
wall, a few
coats
of white paint
on the box serves to seal the cardboard and will
help the
decorative
colors "pop."
Step 2 ~ select the scrap image and paint the egg box
Select a scrap picture from Blümchen's
Scrap Pictures Shop. Choose a paint color that will
both complement and highlight the scrap image. Paint the egg at least two times, allowing the
paint to dry fully between each coat. If you decide to use a metallic or pearlized paint, it has
been our experience that three or more coats gives the color a richer, more vibrant gleam.
Step 3 ~ choose the Dresden edging trim
Choose the decorative border trim that will best suit your egg from our
Dresden Trims Shop.
You
can always use just one Dresden border to finish off the edges of your egg box, but we
prefer to combine multiple designs for a more ornate look. And do be aware that the larger
the egg you are decorating, the wider your trim should be. You can either use one wide style
of trim, or layer a few different Dresden borders to achieve the desired width.
Step 4 ~ glue on the scrap picture
Now that you have painted the egg box and decided on the scrap image and Dresden border
trims, you are ready to start decorating the egg. If you are planning on decorating both sides
of the egg, we highly
recommend that you begin on the back half of the egg first! This way,
you can
practice your scrap-gluing techniques where any mistake won't be readily evident.
This is an especially good tip if you are new to the craft. Even craftspeople as experienced
as our artists always decorate the
back first in order to work out any kinks in the design.
OK -- you may be thinking, "hmm... the scrap is flat, and the egg is curved. How does the
next step work?" This part is a bit tricky, but the more eggs you decorate, the easier it will
become. The basic idea is to cut lines that point towards the center of the scrap, so that
when gluing the pieces down they can be overlapped in order to curve along the surface of
the egg. As you gain more advanced skills, you will begin to see how you can "hide" these
cuts in the image by
trimming along natural "seams" in the scrap picture design. For instance,
when
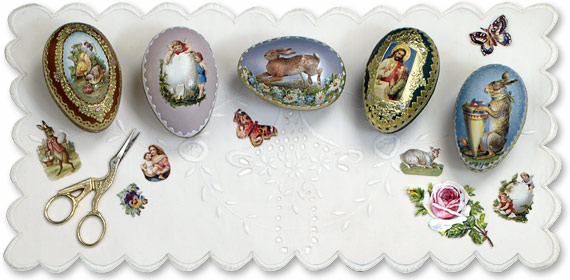
we made the Easter
Bunny egg box which is pictured at the top right of this page, we
made
cuts
along the ribbon at
his neck,
curving along
the top of his hind leg,
behind his left
foot, and a straight cut
along
the
inner edge of the cone. The idea is to keep as much of the
integrity of the original scrap
shape as possible so that the cuts are not readily evident.
For beginners, keep this tip in mind: the smaller the scrap, the fewer the cuts. Larger scraps
mean more, and trickier, cutting. Please note that the cuts do not have to be straight, or even
to aim exactly towards the center of the scrap. For some of the egg boxes we decorated,
the cuts were quite squiggly because we were following along natural "seams" in the image.
Be careful to properly position the scrap on the egg when
you are gluing it onto the egg box.
A wet scrap isn't too easy to shift around, especially if it is a larger
design that requires a lot
of intricate cuts. For larger scrap designs, you can paint a thin coat of white craft glue onto
just the central
area on
the back of the scrap, then working out from the center, add
glue as
you paste down each section, being careful to smooth down the pieces as you work.
Step 5 ~ glue on the Dresden edging trim
First, be sure that your Dresden border trim is long enough to fit around the unfinished edge
of the egg with at least 1/2" overlap. You will need two pieces of Dresden border trim, one
for each half of the egg. Using white craft glue that is not too moist (we prefer a tacky type
of
white glue for this step), carefully apply the glue to the back side of the border with a paint
brush. Our artists also like to apply more tacky glue directly to the edge of the egg box while
the trim is
being
pasted
down to
ensure that the trim
will stay nice and flat on the egg.
While the ends of the border should meet at the bottom of the egg, we recommend that you
start gluing the trim at the top of the egg and work down towards the bottom. This way, you
can position the points or scalloping of the Dresden trim to best frame the scrap image.
As you glue on the trim, make sure that it follows the edge
of the egg as
evenly
as possible.
When the border ends meets at the bottom, try to cut the pieces
so that the
overlap
will not
be too noticeable.
Press the trim firmly onto the
egg box, then using
a
slightly
damp cloth or
paper
towel, wipe gently to remove any excess
glue that might
be visible.
Finally, when positioning the Dresden border trim on the edges of the egg, remember that the
trim
on
both halves of the egg box should mirror each other as exactly as possible for a neat,
finished look.
After gluing the border on the first side, put the two halves
of the egg box back
together, then start gluing on the second piece of trim. This way,
you can make sure that the
trim will be in the same position on both sides of the egg.